
How Many Solar Panels Do I Need for My RV?
- ifeoluwa Daniel
- Jan 27
- 7 min read


So you just bought your first RV—maybe a travel trailer for weekend escapes to Big Bend, or a motorhome for those epic Colorado mountain summers. You're picturing yourself camped out under the stars, totally off-grid, no hookups needed.
And now you're googling "how many solar panels do I need for my RV?"
Here's the thing: that's the wrong question to start with.
And if you jump straight to buying solar panels without figuring out a few other things first, you're either going to waste a bunch of money on panels you can't fully use, or you're going to end up with dead batteries three days into your camping trip wondering what went wrong.
In this guide, I'm going to show you the correct order to size an RV solar system—and spoiler alert, solar panels are step three, not step one.
Why Starting With "How Many Panels" Is Backwards
Let me paint you a picture of what happens to most people.
You watch a bunch of YouTube videos. Every single one is showing off their solar setup: "Check out my 400 watts!" or "I just installed 600 watts and here's my whole system!"
You think, "Okay cool, I need 400 watts. Let me go buy four 100-watt panels."
Here's why that doesn't work:
Solar panels produce electricity when the sun's shining. That's their only job.
But your battery bank stores that electricity so you can use it at night, on cloudy days, or when you're parked in the shade.
If you size your panels without thinking about your battery capacity, you're setting yourself up for failure.
Scenario A: You have way more panels than battery capacity
You install 400 watts of solar but you only have 100 amp-hours of battery. By 10 AM on a sunny day, your batteries are fully charged. Now your panels are still cranking out power, but there's nowhere to put it—you're just wasting solar production. Congratulations, you spent money on panels you literally can't use.
Scenario B: You have way more battery than solar
You buy 400 amp-hours of batteries (smart!) but you only put 200 watts of solar on the roof (not smart). Your batteries drain overnight running your fridge and fans. The next day, your tiny solar array barely gets them back to 60% before sunset. By day three, you're running the generator because your batteries are toast.
Sound familiar?
The right way to size an RV solar system:
Figure out how much power you actually use in a day
Size your batteries to store 1-2 days of that power
Size your solar panels to recharge those batteries in one good sunny day
Pick the right charge controller to manage it all
Consumption → Batteries → Panels → Controller.
In that order. Always.
Step 1: Calculate Your Daily Power Usage (It's Easier Than You Think)

First things first: you need to know how much electricity you're actually going to use in a typical day of camping.
Don't freak out about the math. It's easier than you think.
Here's what you do: make a list of every appliance and device in your RV that uses power. For each one, you need two numbers:
Watts: How much power does it use? (Check the label or Google it)
Hours: How many hours per day will you run it?
Multiply watts times hours, and you get watt-hours—that's your daily energy consumption for that item.
Let me give you a real example. This is pretty typical for a weekend warrior setup:
12V Fridge: Runs 24/7 (with compressor cycling). Averages about 60 watts. That's 1,440 watt-hours per day.
LED Lights: You've got 4 lights in the RV, 6 watts each. You use them 5 hours at night. That's 120 watt-hours.
Water Pump: 50 watts, but you only run it maybe 30 minutes total per day (brushing teeth, doing dishes). That's 25 watt-hours.
Charging Phones: Two phones, 10 watts each, charging for 3 hours. That's 60 watt-hours.
Laptop: 60 watts for 2 hours. That's 120 watt-hours.
Fans: Two 15-watt fans running 8 hours at night in summer. That's 240 watt-hours.
TV: 50 watts for 2 hours (movie night). That's 100 watt-hours.
Add it all up: 2,105 watt-hours per day.
Now here's the thing: you're always going to use more power than you think. Always. Maybe you forget to turn off a light. Maybe you charge your laptop twice. Maybe you run the water pump more than you estimated.
Add a 20% safety buffer.
2,105 × 1.20 = 2,526 watt-hours per day.
Let's round it to 2,500 watt-hours to keep the math easy.
That's your number. Write it down. You'll need it for the next steps.
Step 2: Size Your Battery Bank (This Is What Actually Matters)

Alright, so you need 2,500 watt-hours per day. Cool.
Now the question is: how big does your battery bank need to be?
And the answer depends on how many days you want to camp without seeing the sun.
Most RVs run on 12 volts (some bigger rigs are 24V or 48V, but let's keep it simple). To convert your watt-hours into amp-hours—which is how batteries are rated—you just divide by the voltage.
2,500 watt-hours ÷ 12 volts = 208 amp-hours.
But hold on. That's only one day's worth of power.
What if it's cloudy tomorrow? What if you're parked under some big trees? What if it's December and you're only getting 3-4 hours of weak sun?
You've got to decide: how much battery autonomy do you want?
Option 1: One Day of Storage (208 Ah)
If the sun comes out tomorrow, you're golden. If it doesn't? You're either running the generator or you're rationing power like you're on a submarine.
Option 2: Two Days of Storage (416 Ah) RECOMMENDED
This is the sweet spot for most people. You can handle one cloudy day no problem. Two cloudy days in a row? Okay, now you're thinking about the generator. But you've got breathing room.
Option 3: Three Days of Storage (624 Ah)
This is for serious boondockers who are camping on BLM land in Arizona for two weeks straight. It's expensive and it's heavy, but if that's your style, go for it.
Let's go with two days: 416 amp-hours.
Now here's where battery chemistry becomes super important.
Lithium Batteries (LiFePO4):
You can safely use about 85% of their rated capacity without damaging them.
To get 416 usable amp-hours, you need: 416 ÷ 0.85 = 490 Ah of lithium batteries
Most people just buy two 12V 200Ah lithium batteries. That's 400 Ah total. Close enough.
Cost: $2,000-$2,800 for the pair.
AGM or Lead-Acid Batteries:
You can only safely use about 50% of their capacity before you start damaging them.
To get 416 usable amp-hours, you need: 416 ÷ 0.50 = 832 Ah of lead-acid batteries
That's four big honkin' 6V golf cart batteries wired in series/parallel.
Cost: $1,600-$2,400 upfront, BUT you're replacing them every 3-5 years.
The Lithium vs Lead-Acid Reality:
Yeah, lithium costs more upfront. But do the 10-year math:
Lead-Acid Total Cost (10 years):
Initial purchase: $2,000
Replacement at year 3: $2,000
Replacement at year 6: $2,000
Replacement at year 9: $2,000
Total: $8,000 (plus you're hauling an extra 400 lbs)
Lithium Total Cost (10 years):
Initial purchase: $2,400
Maybe one replacement at year 8-10: $2,400
Total: $2,400-$4,800
Lithium wins. Every time. Plus you're not destroying your gas mileage hauling all that extra weight around.
Go with lithium if you can possibly swing it.
Step 3: NOW We Can Talk About Solar Panels

Okay, FINALLY we get to solar panels.
You need 2,500 watt-hours per day. You've got 400 amp-hours of battery to store it. Now you need enough solar to recharge those batteries in one good sunny day.
Here's the formula:
Daily watt-hours ÷ peak sun hours = solar watts needed
What Are "Peak Sun Hours"?
This varies by location and season. It's not the same as "hours of daylight"—it's the equivalent hours of full-intensity sun you get per day.
Summer:
Texas: 5-6 peak sun hours
Arizona: 6-7 peak sun hours (best in the country)
Colorado: 5-6 peak sun hours
Winter:
Texas: 4-5 peak sun hours
Arizona: 5-6 peak sun hours (still excellent)
Colorado: 3-4 peak sun hours
Let's be conservative and use 4 peak sun hours. That way your system works even in winter or shoulder seasons.
2,500 wh ÷ 4 hours = 625 watts of solar
But there are always losses—wiring resistance, dust on panels, charge controller inefficiency. So add 25%.
625 × 1.25 = 781 watts
Round up to 800 watts of solar.
What Does 800 Watts Look Like?
Four 200W rigid panels (most common setup)
Two 400W high-efficiency panels (newer option, fewer panels to mount)
Three 250W panels + one 100W (if roof space is weird)
DO NOT buy flexible panels unless you absolutely have no other choice. They cost 2-3x more per watt, they overheat (killing efficiency), and they fail in 3-5 years. Rigid panels will last 20-25 years.
Cost for 800W of rigid panels: $600-$900 depending on brand.
Step 4: Your Charge Controller (The Brains of the System)
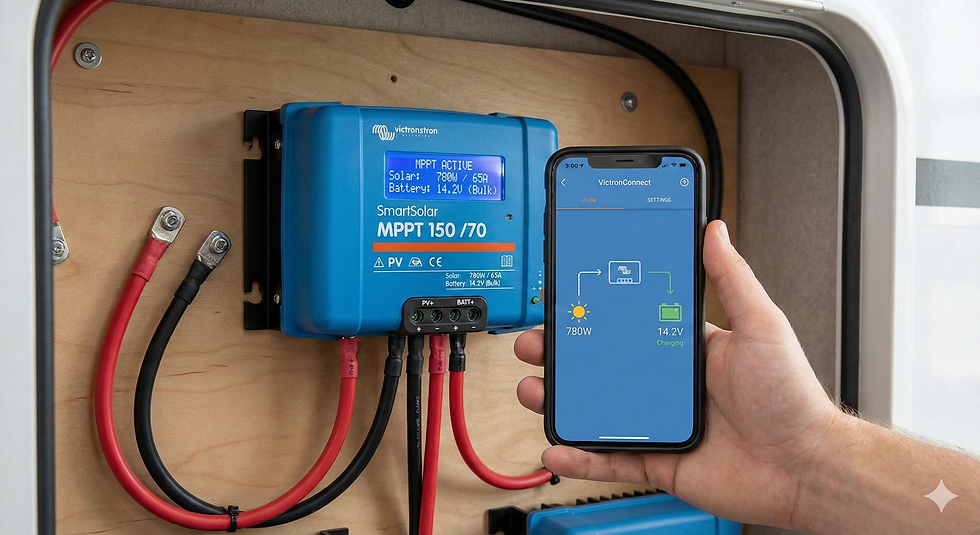
Last piece: the charge controller. This is the box that sits between your solar panels and your batteries, regulating voltage and current so you don't overcharge and damage your batteries.
You want an MPPT charge controller, not a PWM. MPPT is 20-30% more efficient. It's worth the extra $50-100.
Sizing Your Charge Controller:
Solar watts ÷ battery voltage × 1.25 = minimum amps needed
800W ÷ 12V × 1.25 = 83 amps
So you need a 100-amp MPPT charge controller.
Top Recommendations:
Victron SmartSolar 100/50: ~$350-$400The gold standard. Bluetooth monitoring via phone app. Excellent build quality. Worth every penny.
Renogy Rover 100A: ~$250-$300Solid budget option. No Bluetooth, but it works great and it's reliable.
Epever Tracer 100A: ~$200-$250Budget-friendly if you're trying to save money. Not as nice as Victron but gets the job done.
Don't cheap out on some random $80 Amazon special. Your charge controller is the brains of your system. Spend the money here.
Your Complete RV Solar System
Alright, let's put it all together. Here's what a properly sized RV solar system actually costs for the example we've been working through:
Component | Specification | Cost |
Solar Panels | 800W (4× 200W rigid) | $600-$900 |
Battery Bank | 400Ah Lithium (2× 200Ah) | $2,000-$2,800 |
Charge Controller | 100A MPPT (Victron or Renogy) | $250-$400 |
Wiring & Mounting | MC4 cables, roof mounts, fuses, breakers | $200-$300 |
Installation | DIY or professional | $0-$800 |
At IntegrateSun, we install residential solar + battery backup systems across 12 states. The economics of home solar are often better than RV solar because:
You use the power every single day (not just camping trips)
You can sell excess production back to the grid through net metering
The system typically pays for itself in 7-10 years through savings
I'm not trying to upsell you. I'm just saying, if you're thinking about energy independence for camping, you should probably think about energy independence for where you actually live.


